WhatsApp Business Cloud API: A Simplified Guide in 2026
“The best business experiences meet people where they are.” - Mark Zuckerberg, Conversations Keynote Speech, 2023
When Mark Zuckerberg uttered these words during Meta's inaugural Conversation event, he wasn't just making something up. Recently, Meta announced that you can now provide your clients with customized experiences thanks to the WhatsApp Cloud API.
Using WhatsApp web business with the WhatsApp API ensures efficient handling of large volumes of messages on your computer. This revolutionized how you can use WhatsApp and customer engagement to boost sales by allowing you to send messages at scale to thousands of customers instantly.
Now, if you are unfamiliar, you might ask how to use WhatsApp Cloud API to power up your conversations. Well, worry not. In this blog post, you’ll learn everything about WhatsApp Cloud API with a step-by-step guide on how to set up and use it.
What is WhatsApp Cloud API?
When Meta launched the WhatsApp Business API, there were certain drawbacks to it. One of the biggest ones is to use a Business Service Provider (BSP) to obtain the API.
On top of that, the application process took a long time, and few businesses could afford the outrageous fees that BSPs were charging.
So, to make its API more accessible, Meta introduced the WhatsApp Cloud API, which replaces the BSP servers with cloud servers owned by Meta. Because of this, WhatsApp Business Cloud API is more affordable and convenient for businesses of every size to boost growth with the sales process.
With WhatsApp Cloud API, you can request Meta to immediately verify your WhatsApp Cloud API accounts for free. This means that if you’re a small or medium-sized business, you can easily personalize your customers' WhatsApp experiences.
Benefits of WhatsApp Cloud API
There are several benefits of using WhatsApp Cloud API vs the On-premise one. These include:
Less resource intensive
WhatsApp didn't want to deal with extra staff members who handled API applications. WhatsApp believed that going through a partner would make the process simpler.
Swift approval process
For access to the WhatsApp Cloud API in the past, you had to rely on BSPs and wait for the approval. But now, you can have direct access to the WhatsApp API thanks to the WhatsApp Cloud API, which effectively cuts out the middleman.
Fast updates
You have direct access to the WhatsApp Cloud API, as was already discussed. As a result, you get immediate access to all updates made to the API for free.
Minimized costs
You can access the WhatsApp Business API for a fee via BSPs. However, the setup fees for the WhatsApp Cloud API are completely free. As a result, companies of all sizes can now use the WhatsApp Business API to start sending WhatsApp blasts without having to pay anything.
Differences between On-premise WhatsApp API and WhatsApp Cloud API
| Features | On-premise WhatsApp API | WhatsApp cloud API |
|---|---|---|
| Accessibility | Only available after signing up with a Business Service Provider. | Accessible for free through Meta. |
| Hosting | You must host the API software on your own servers or on BSPs’ servers. | WhatsApp Cloud API is hosted on Meta’s servers. |
| Cost | You have to pay the installation and maintenance price set by your BSP. Additionally, you have to pay for each message you send. | You simply need to pay for each message sent or conversation. |
| Protocol of API | REST API is used in On-premise WhatsApp API. | Uses Graph API. |
| Maintenance | Software upgrades must be carried out through your BSP as and when they become available. | Meta updates the cloud API's software, adds new functionality, and makes these updates automatically. |
| Uptime | Cannot be described because it is reliant on the infrastructure of the BSP. | Meta assures a 99.9% uptime. |
Ready to incorporate WhatsApp into your marketing channels?
Get started with Zixflow WhatsApp marketing platform for free and reach out to millions of people globally
Get in TouchHow to send messages using WhatsApp business cloud API?
You are able to send and receive up to 80 messages per second to a variety of client numbers using the Cloud API service. If scaling is a concern, WhatsApp Cloud API automatically scales to handle your workload and refreshes its security automatically as well.
Now that you know what is WhatsApp Cloud API, I’ll walk you through the process of how to set up and use WhatsApp Cloud API for sending messages
Step 1: Create your Meta Developer Account
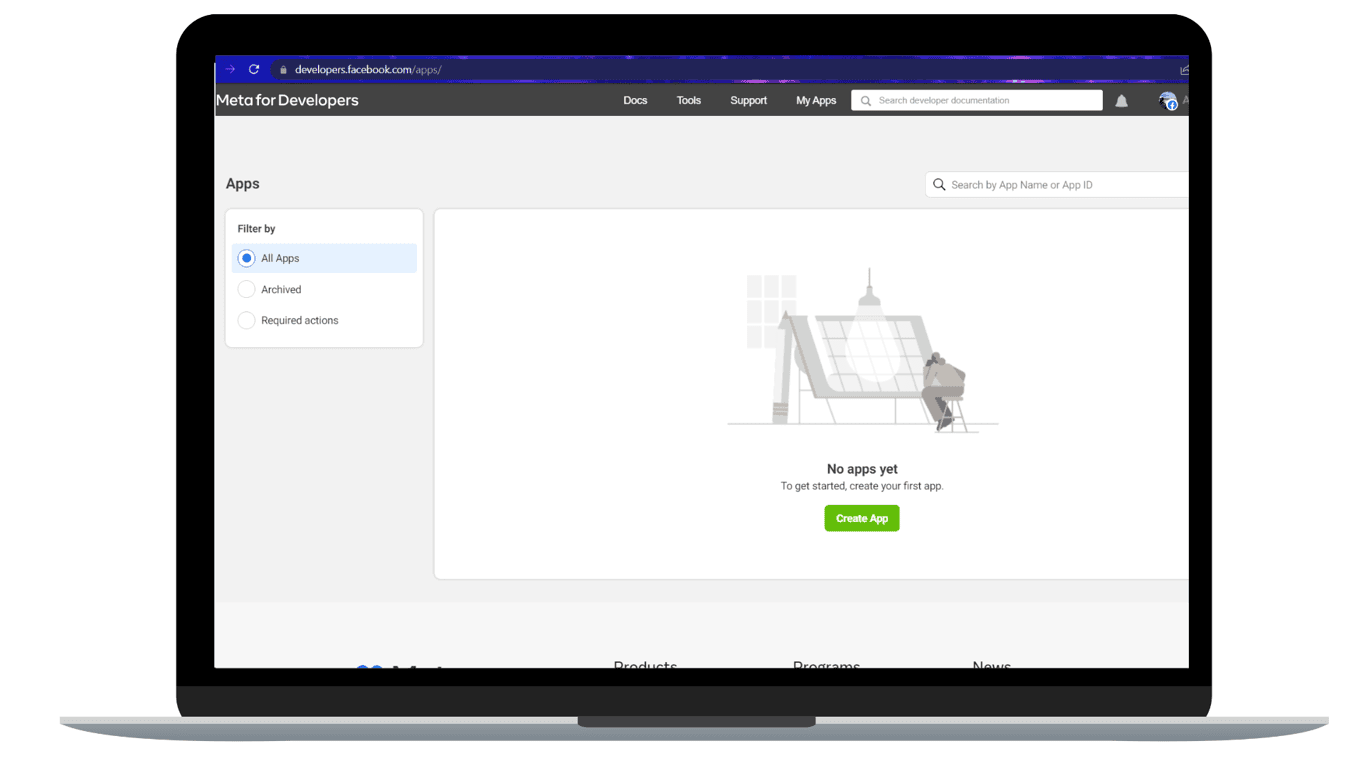
Visit the Meta for Developer page and log in with your Facebook credentials. You need a Facebook account to start using the WhatsApp Cloud API. If you don’t have a Facebook account, you can create one on this page. Then, click on the "Create App" button.
Step 2: Select the type of app
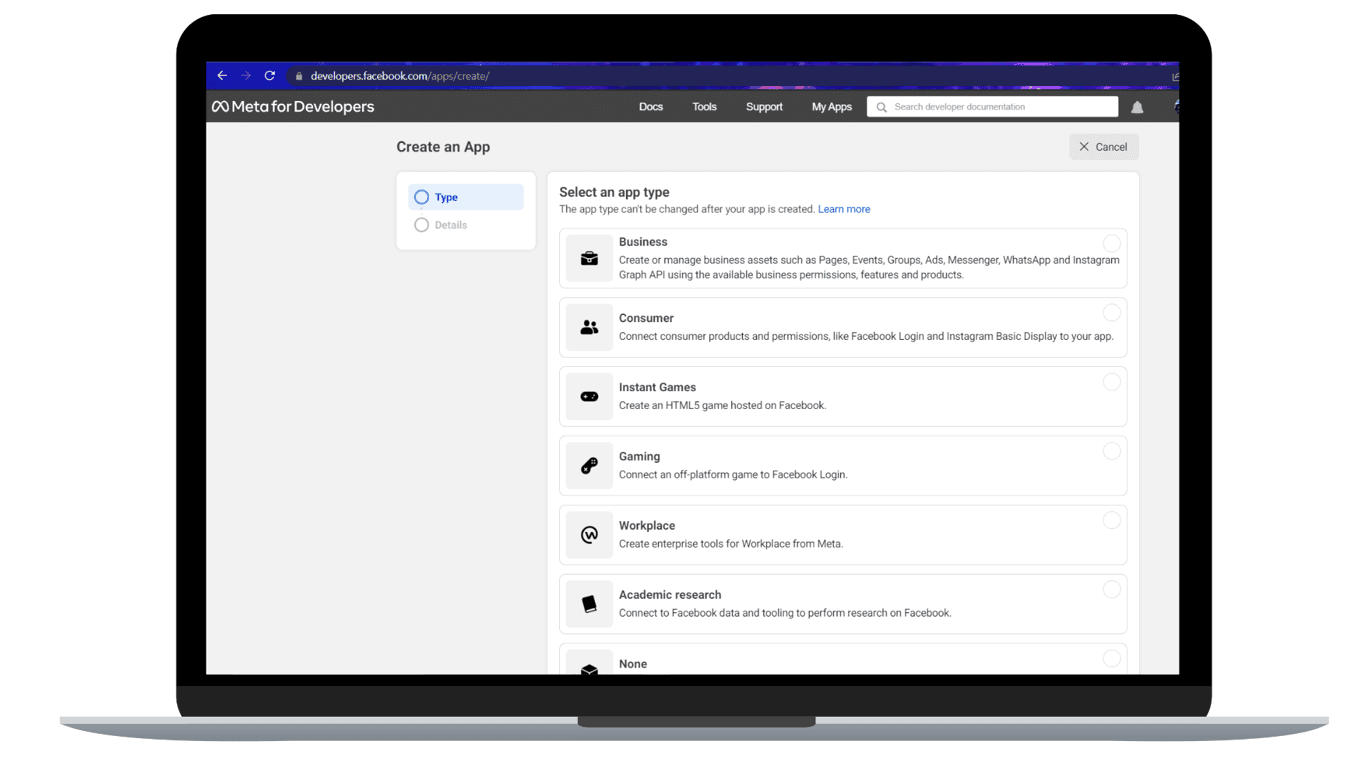
Select "Business" as your app type in the following stage.
Step 3: Enter your basic information
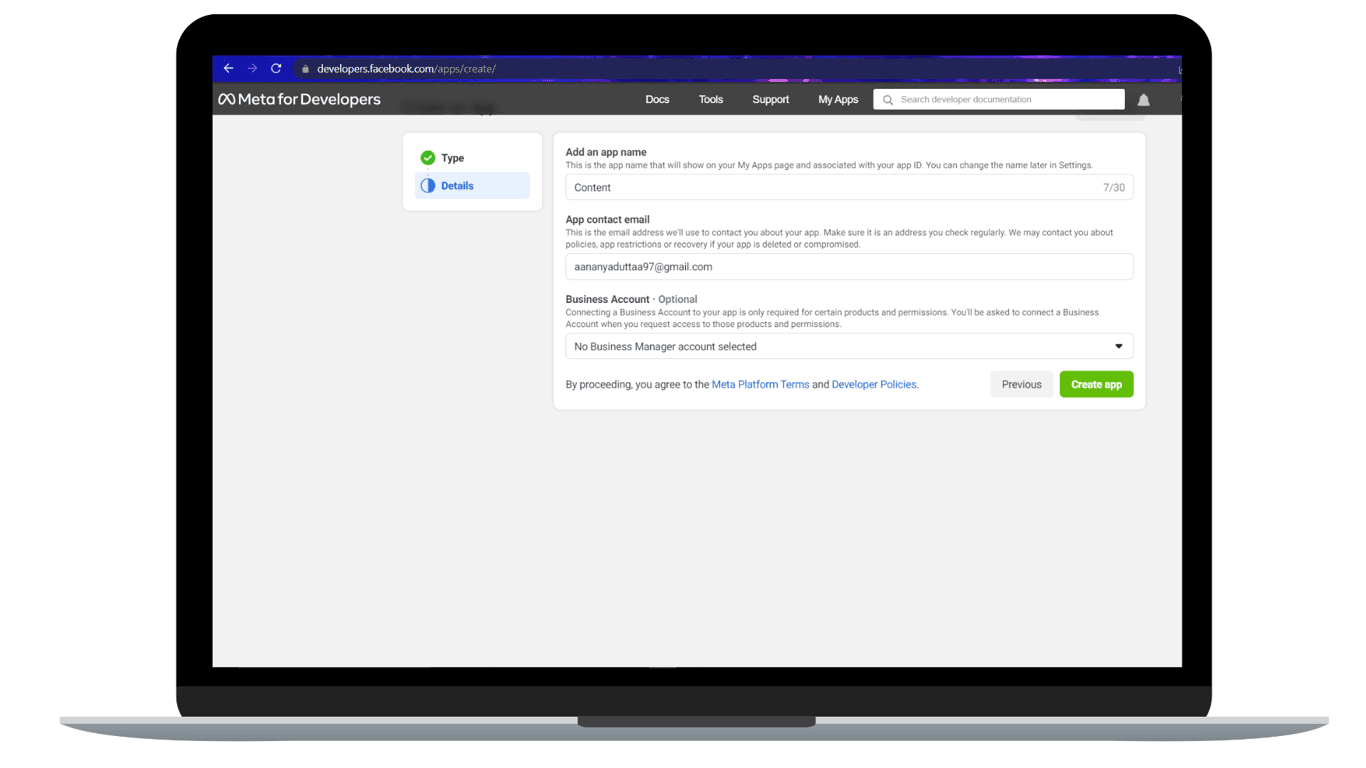
You must enter some basic information about your company in the following step. After that, if you already have a Facebook Business Manager account, you can select one from the drop-down list.
If not, you can choose "No Business Manager account selected" for the time being and Facebook will create one for you. Next, click "Create App."
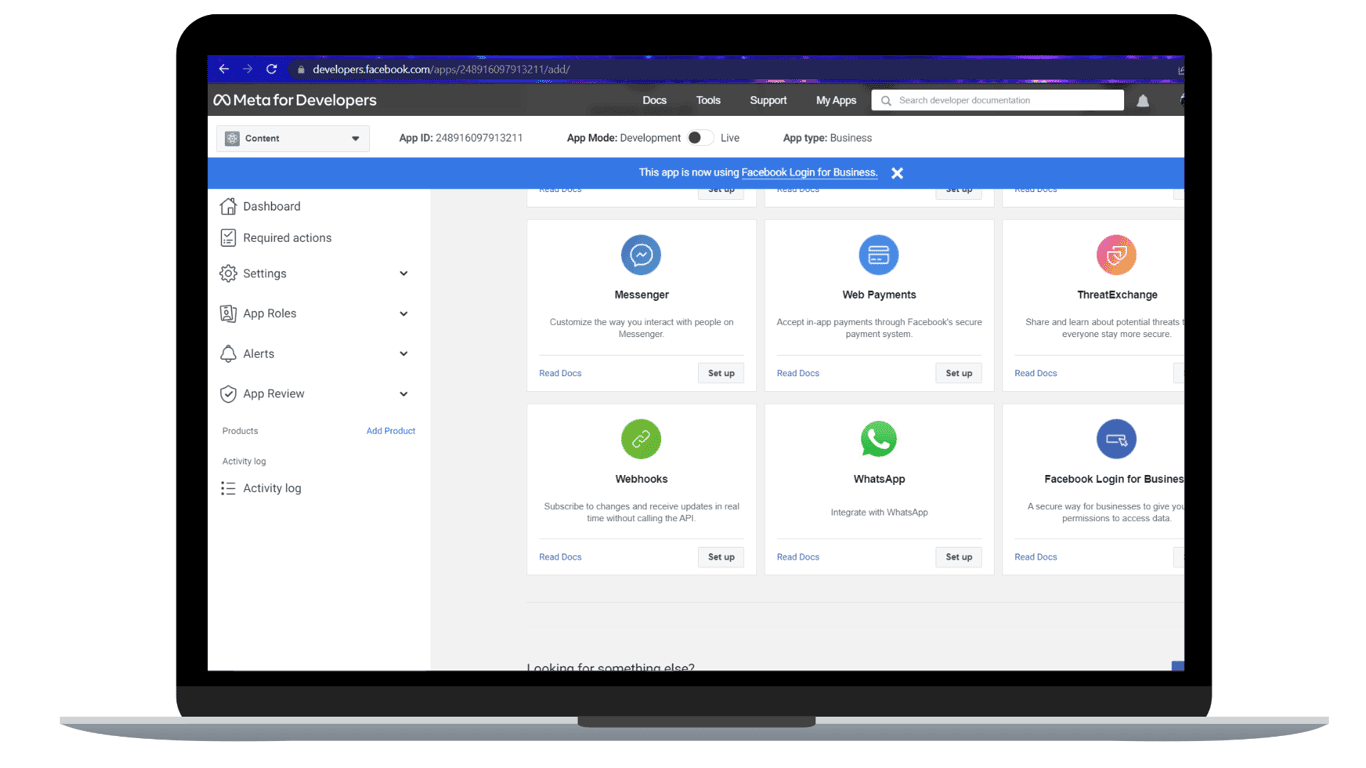
Step 4: Choose WhatsApp from the dashboard
You should now be signed into your Meta dashboard successfully. From here, select "Set up" under the WhatsApp section.
Increase your business growth with Zixflow’s easy-to-use WhatsApp integration
Use Zixflow’s WhatsApp feature today to send bulk messages and level up your business growth
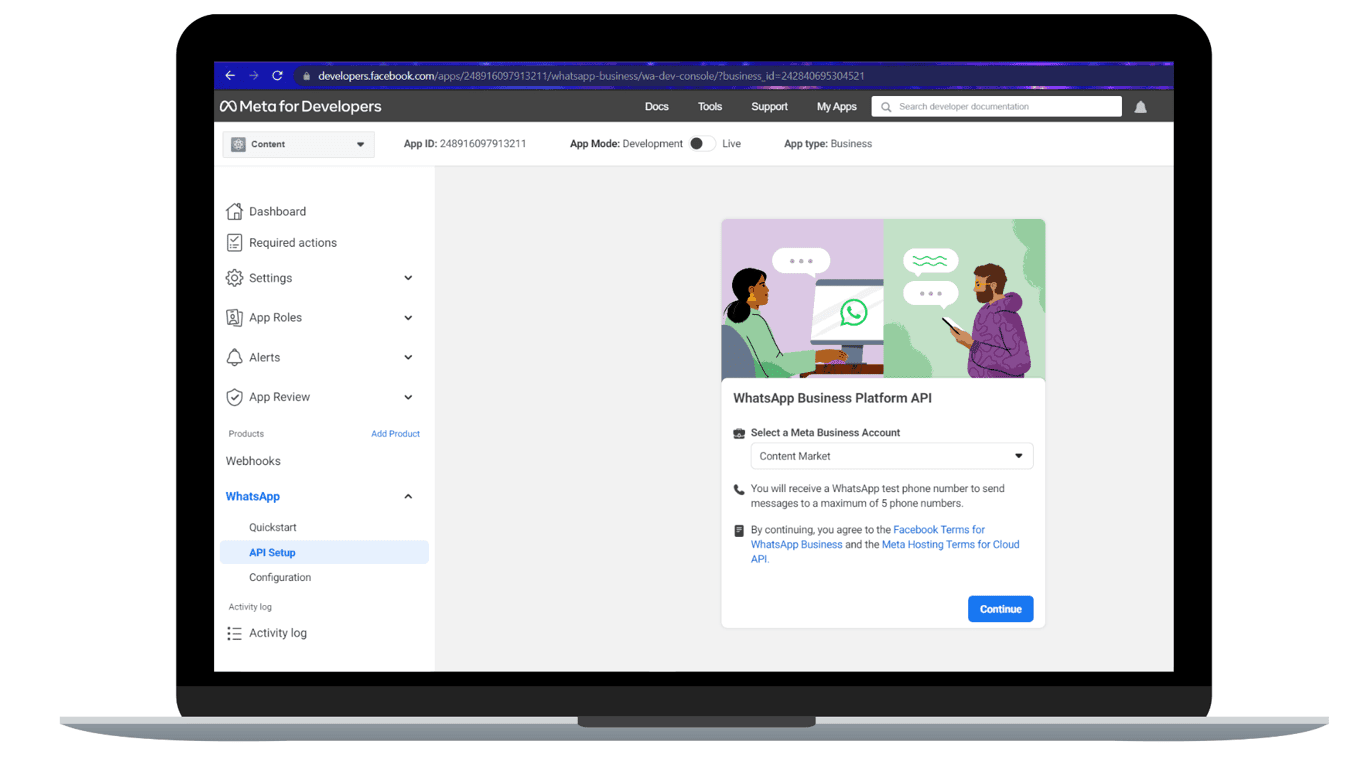
Login TodayStep 5: Select a Meta Business Account
You must agree to the Terms and Conditions before using the WhatsApp Cloud API, which is listed on the following screen. Once you click the "Continue" button, you can proceed.
Step 6: Add a number to your WhatsApp account
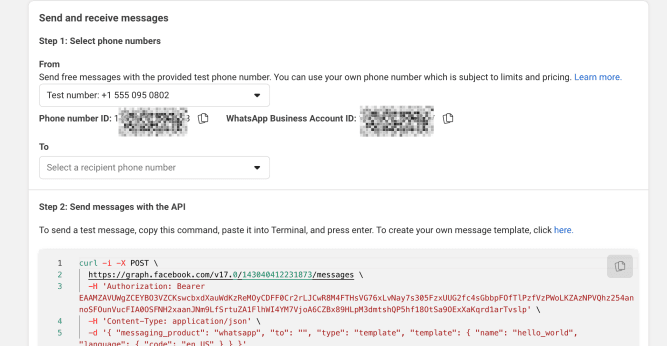
Now you are at the Dashboard. Both a unique ID for your phone number and an ID for your WhatsApp Business account are provided here.
Your personal Test number serves as the "From" number. You should enter the number you want to send your first WhatsApp text to as the "To" number.
Step 7: Enter the verification code
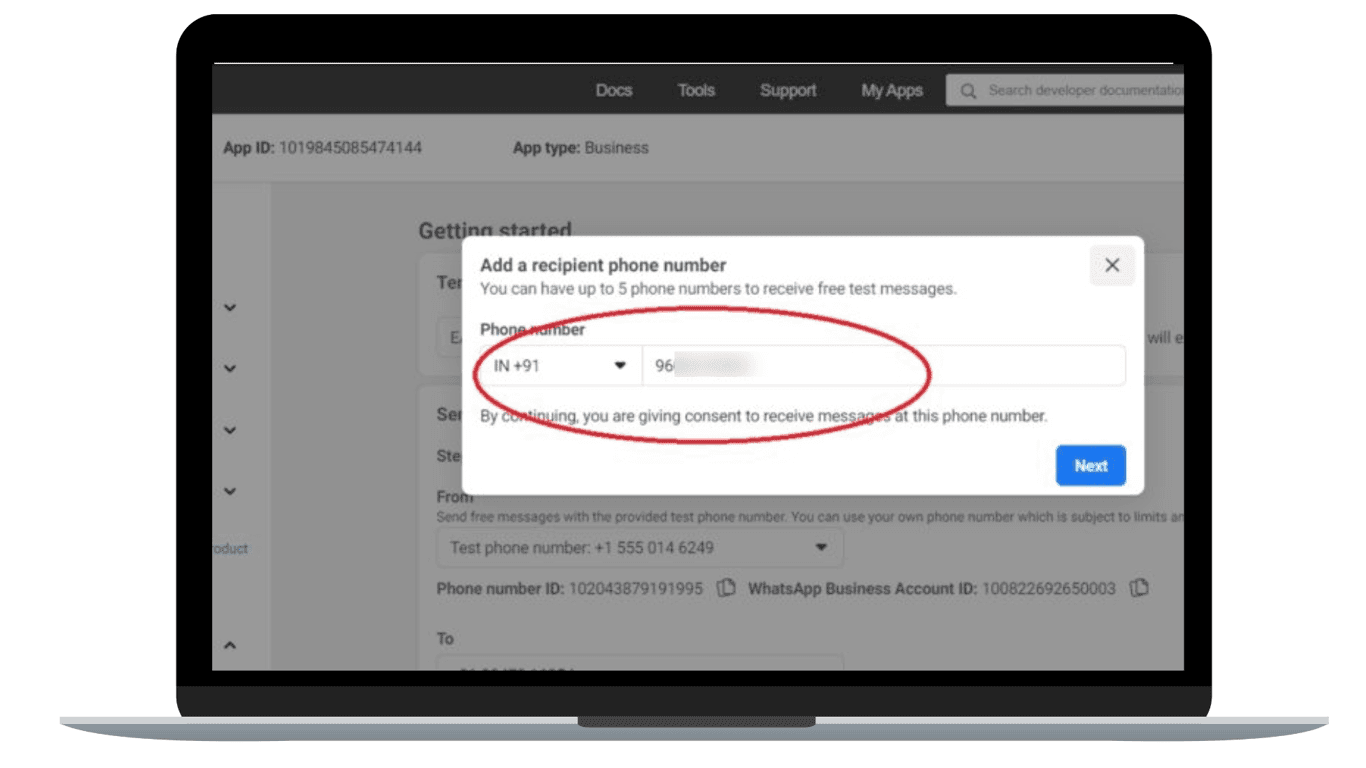
Facebook Business will send you a verification code for your phone. Fill out the boxes with this number to complete the verification.
Seeking a free platform that provides WhatsApp integration?
Experience Zixflow’s cost-free solutions leveraging WhatsApp business cloud API for your business growth
Book A DemoStep 8: Send the first text using WhatsApp Cloud API
As it is, WhatsApp Cloud API doesn’t have a frontend interface and you would need a marketing platform to integrate with it to send messages. This can be done through Whatsapp CRM where you integrate your CRM software with whatsapp using Cloud API to run your outreach campaign on Whatsapp.
With that said, you can use Zixflow, a WhatsApp marketing solution, to send bulk WhatsApp messages through broadcast to elevate your WhatsApp efforts.
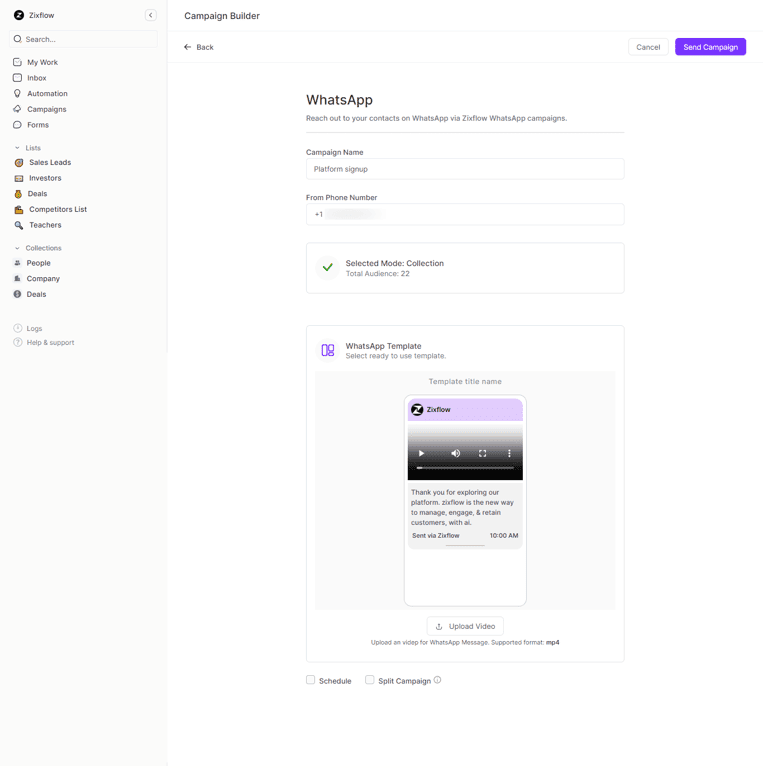
As Zixflow is one of the best WhatsApp automation tools, you can utilize WhatsApp to automate, schedule, and send personalized 1:1 messages or initiate group WhatsApp conversations for marketing, types of sales, and support, all from a single, user-friendly dashboard. Make sure you learn some great WhatsApp automation hacks as well, so you can use this tool to the fullest. Here’s a video to explain how you can use Zixflow to run WhatsApp campaigns.
Basics of WhatsApp Business Management API
The Business Management API takes care of important things like logging in, keeping your account safe, and organizing your WhatsApp Business Account. It's like the manager of your account, making sure everything runs smoothly and securely.
The primary Cloud API is where you get to work. It's what allows you to send messages and talk to your customers. This part is all about actually doing business on WhatsApp, like chatting with customers and sending them messages.
So, while the Business Management API handles the background work, the primary Cloud API lets you get things done and talk to your customers. With that mentioned, I will explain its essentials in depth from sending messages using WhatsApp Business templates to accessing tokens.
Easy steps to send messages using WhatsApp Business templates
WhatsApp message templates are ready-made messages that businesses use to send you important updates or messages. These are only sent to customers who have said they want to get messages from that business. These messages can be about things like account updates, reminding your customers of appointments, personal finance updates, telling them about shipping information, fixing problems they've had, or updating them about reservations.
They're like templates that make it easier for businesses like yours to tell your customers an important message in a clear way. This is how you can send messages
Access Business Manager
Log in to your Facebook Business Manager account, where you manage your WhatsApp Business account.
Navigate to WhatsApp accounts
Within the Business Manager settings, find the WhatsApp Accounts section.
Initiate template creation
Click on “Create Message Template” to start crafting your template.
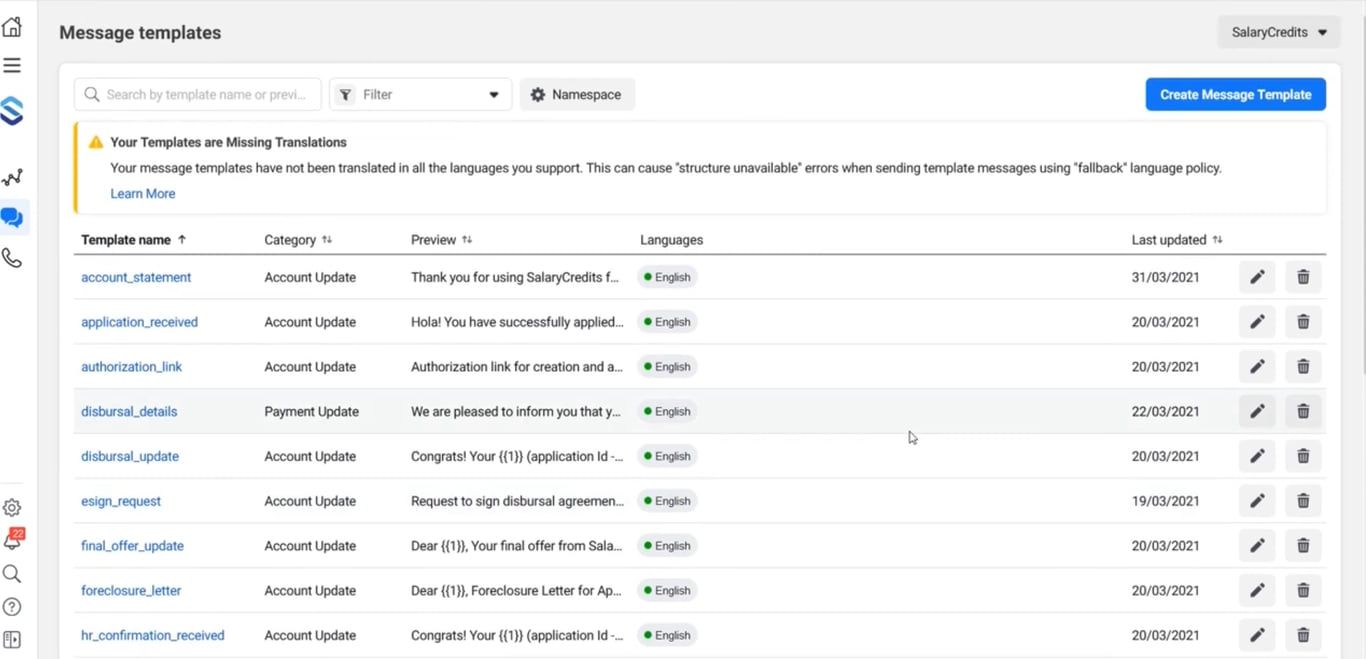
Craft your message template or use pre-approved templates
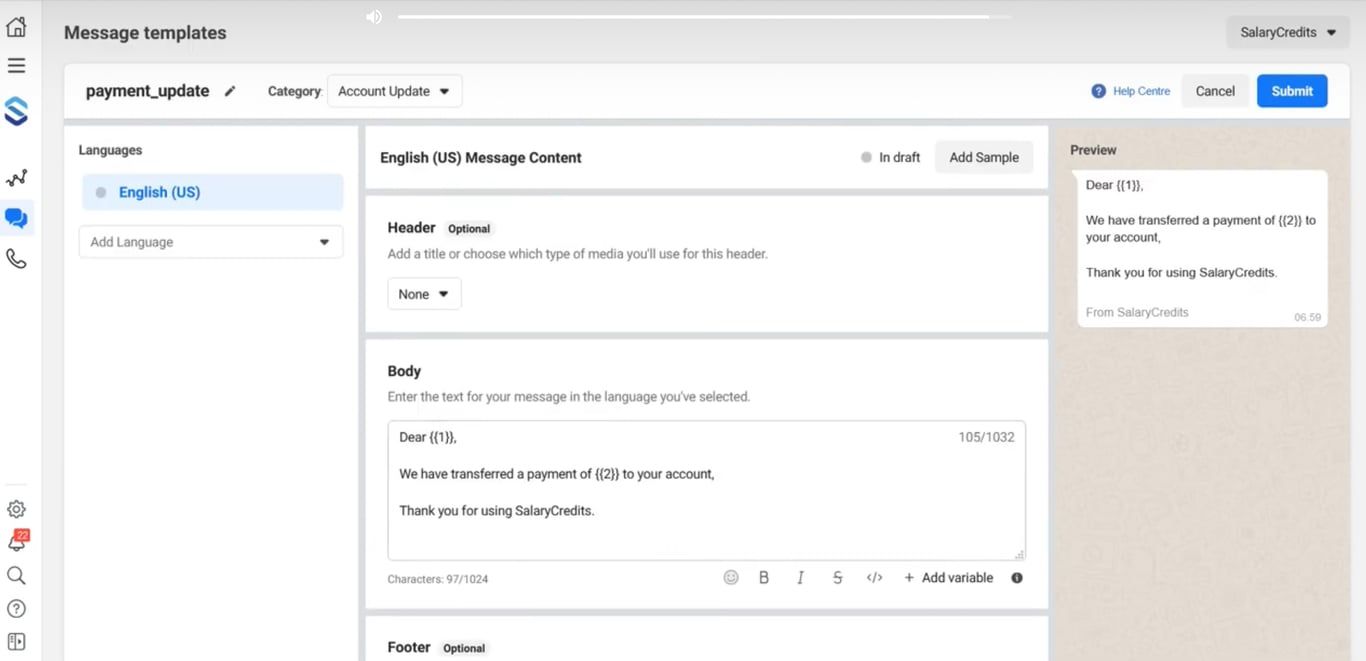
The template consists of several elements:
- Body: This is the main content of your message, conveying the message's purpose or information.
- Header: Provide a brief introduction or context for the message to give recipients clarity.
- Footer: Add your business name or any other relevant information at the end of the message.
- Buttons: Include call-to-action buttons for a more interactive experience, guiding recipients to take specific actions.
If you don’t have that much time to create your message template, you can use pre-approved templates offered by Zixflow.
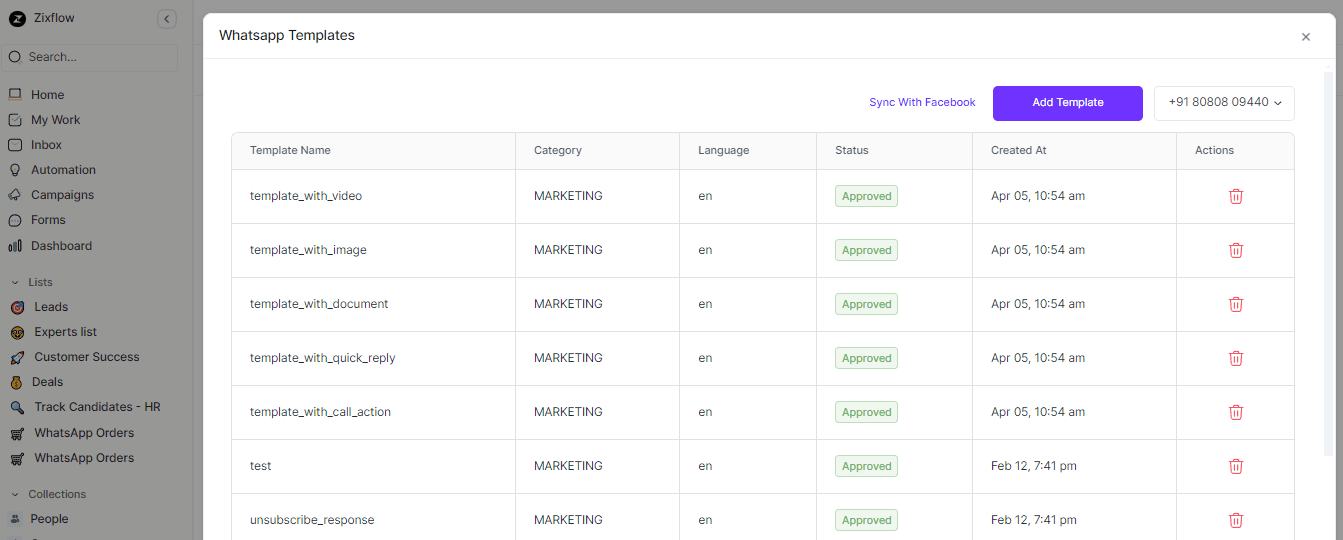
Zixflow offers excellent WhatsApp API services. It is one of the best WhatsApp tools that helps businesses make the most of WhatsApp for marketing and engagement purposes. It allows you to create custom message templates and you can use pre-approved ones. Plus, you can submit your templates for verification, all from one convenient platform.
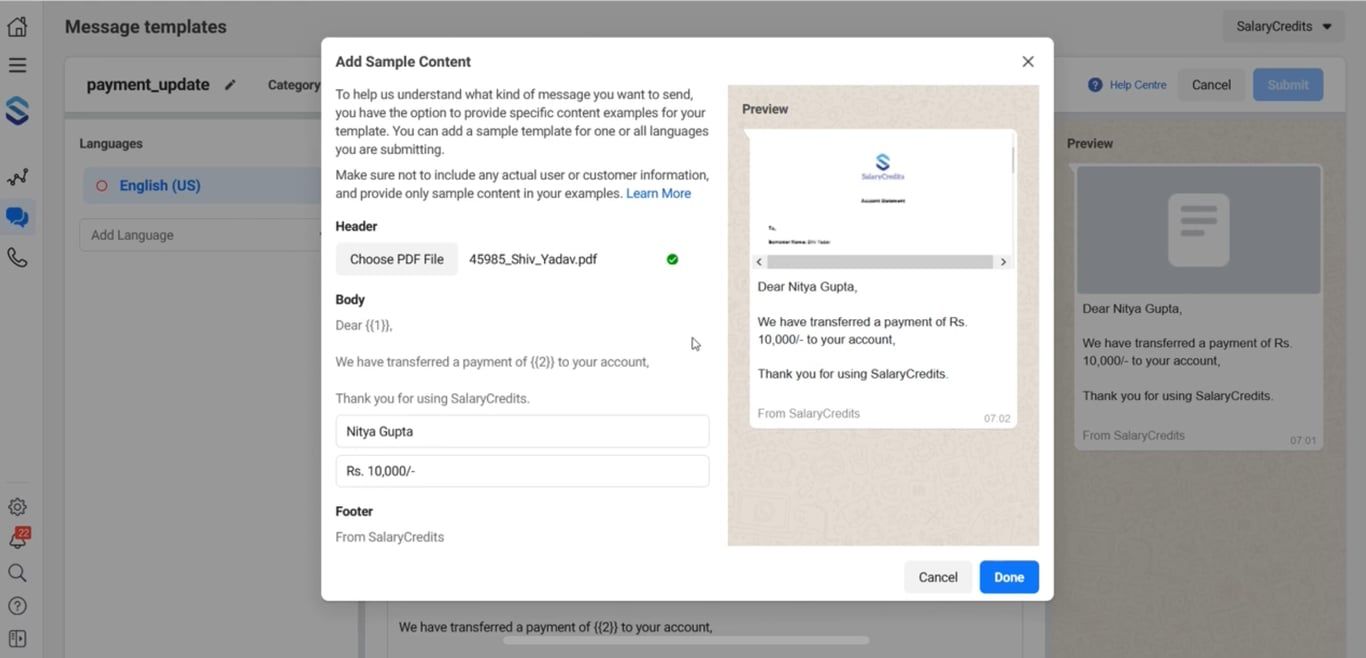
Add a sample
Click on “Add Sample” to provide an example of how your template will be used in a real message, presenting its effectiveness and relevance.
Submit for review
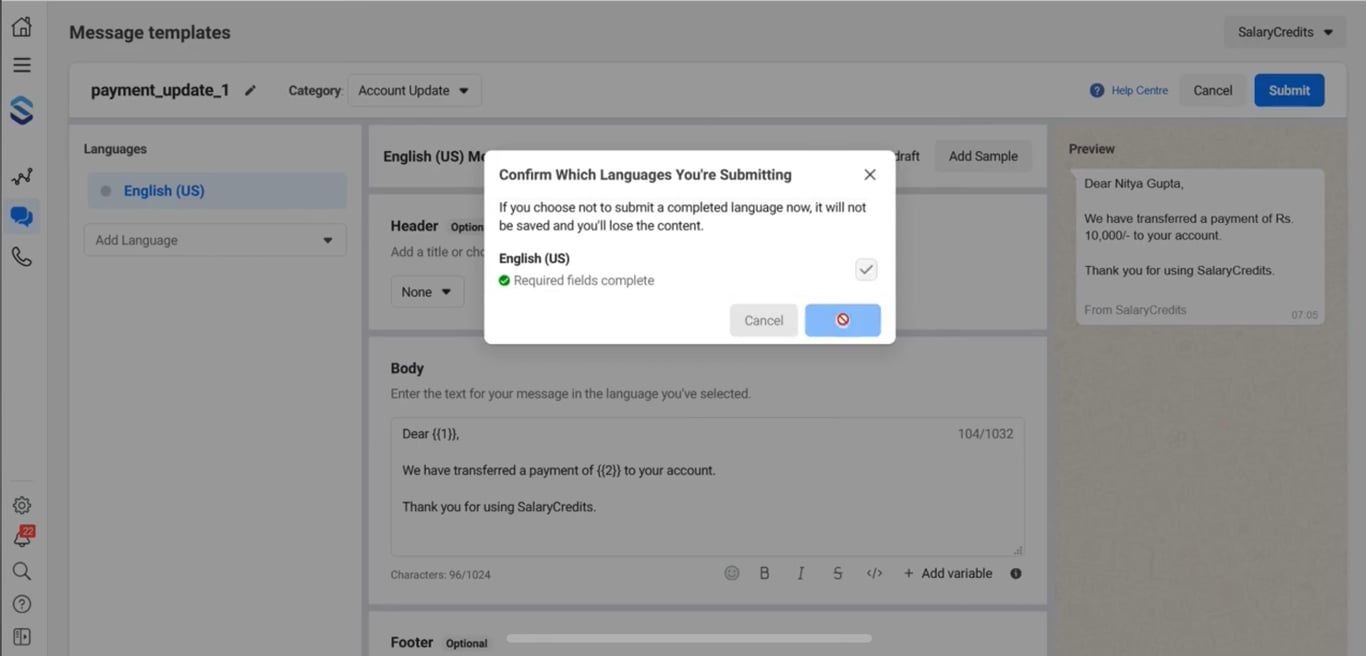
Once you’ve crafted your template and added a sample, review it to ensure it meets WhatsApp’s guidelines. When you’re satisfied, click “Submit” to send it for approval by WhatsApp.
Simple steps to access tokens
The platform offers 3 types of access tokens depending on who will use your WhatsApp Business application and your role as a Solution Provider.
- If you're a developer or it's just you or your business using the app, opt for a System User access token.
- If you're a Tech Provider, choose a Business Integration System User access token.
- Solution Partners can utilize System User access tokens to share credit with new customers, and Business Integration System User access tokens for other purposes.
I've explained each of these options and provided instructions for you on how to create them.
System User Access Tokens
System User access tokens are like IDs for you, your business, or your team members. They don't expire and are great for automated tasks in your business. Solution Partners can use them to share credit lines with new customers. When you use an endpoint, it checks if the token owner can access the requested resource. If not, you'll get an error message that is 200. To get one, first, create a system user, and follow these steps:
- First, log in to the Meta Business Suite.
- Find your business account in the top-left dropdown menu & select its Settings icon.
- Select Business settings.
- Then, go to Users then select System users.
- Lastly, Click on the Add button & make a choice between creating an admin or employee system user.
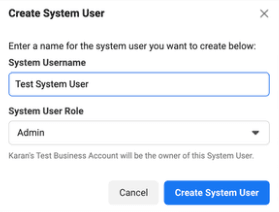
Create system user access tokens
If your employees will use the app, they'll need access to WhatsApp Business Accounts connected to your Meta business. Just create an employee account for them. Then, give it access to the specific WhatsApp Business Accounts they'll use, fully or partly. Here is how you can easily create a system user access token after setting up a system user:
Follow the same steps as I mentioned for creating a system user account, then proceed with the following steps:
- Pick the right system user from the list.
- Hit the Generate new token button.
- Choose the app that will use the token.
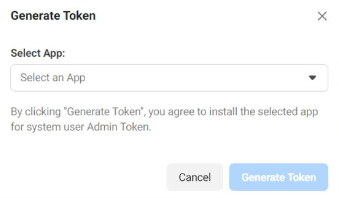
- Decide on the permissions the app requires to work correctly, and then create the token.
User access tokens through business integrationBy default, admin system users automatically have access to all WhatsApp Business Accounts and assets owned or shared with you. They're convenient for accessing new accounts. If you're using an employee system user, you'll need to manually grant access to each account shared with you. You can adjust an admin user's access for specific accounts if necessary.
- To get a Business Integration System User access token, you need to set up Embedded Signup using Facebook Login for Businesses.
- Then, when a customer finishes the signup process, you exchange the code you receive to get the token.
- You can find more details on how to do this in the Embedded Signup and Business Integration System User access tokens documents.
The simple way to send free forms messages using WhatsApp Cloud APIWith the WhatsApp Cloud API, you can send different types of messages that aren't limited to specific templates or formats. This means you have the freedom to craft and send messages in a more flexible and customizable way according to your needs. That’s where Zixflow comes in. Zixflow’s WhatsApp campaign provides those different types of message templates which involve: text, image, audio, video, & location messages.
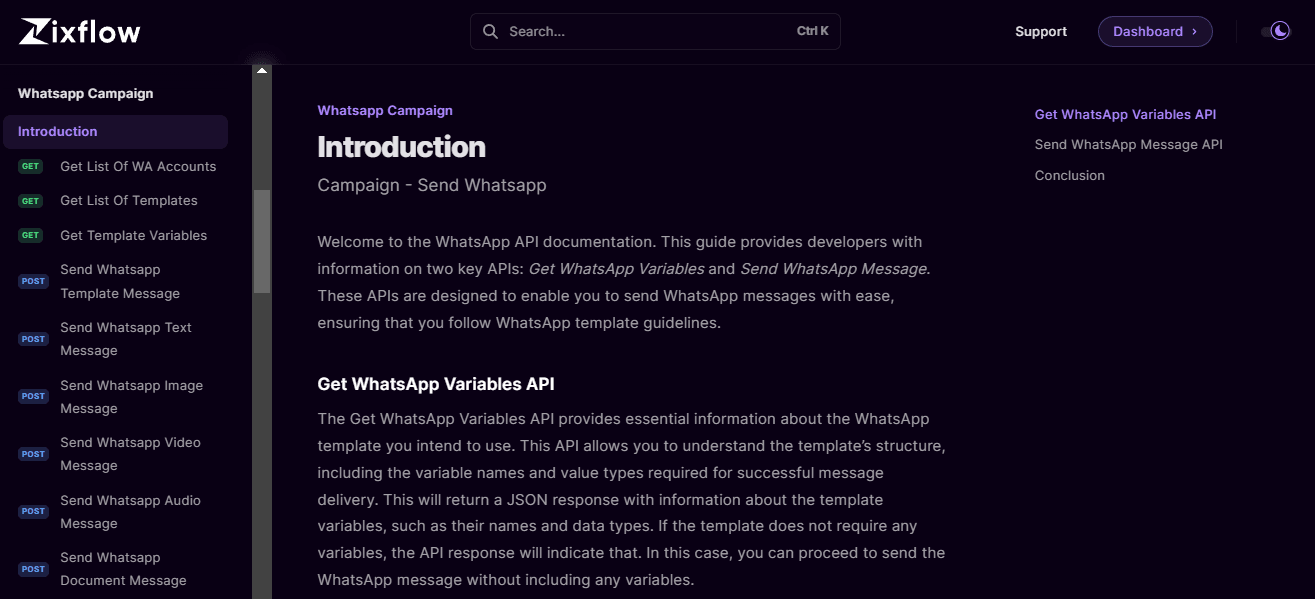
You might be wondering how to send these messages or if there's a specific syntax to follow. Not to worry! I'll provide the syntax for each type of message to make it easier for you.
Syntax to send WhatsApp text message
import requests
url = "https://api.zixflow.com/api/v1/campaign/whatsapp/message/send"
payload = {
"to": "
"phoneId": "
"type": "
"text": {
"preview_url": True,
"body": "
},
"source": "
"linkWithRecord": True,
"submissionStatus": True
}
headers = {
"Authorization": "Bearer
"Content-Type": "application/json"
}
response = requests.request("POST", url, json=payload, headers=headers)
print(response.text)
Syntax to send WhatsApp image message
import requests
url = "https://api.zixflow.com/api/v1/campaign/whatsapp/message/send"
payload = {
"to": "
"phoneId": "
"type": "
"image": {
"link": "
"caption": "
},
"source": "
"linkWithRecord": True,
"submissionStatus": True
}
headers = {
"Authorization": "Bearer
"Content-Type": "application/json"
}
response = requests.request("POST", url, json=payload, headers=headers)
print(response.text)
Syntax to send WhatsApp audio message
import requests
url = "https://api.zixflow.com/api/v1/campaign/whatsapp/message/send"
payload = {
"to": "
"phoneId": "
"type": "
"audio": {"link": "
"source": "
"linkWithRecord": True,
"submissionStatus": True
}
headers = {
"Authorization": "Bearer
"Content-Type": "application/json"
}
response = requests.request("POST", url, json=payload, headers=headers)
print(response.text)
Syntax to send WhatsApp video message
import requests
url = "https://api.zixflow.com/api/v1/campaign/whatsapp/message/send"
payload = {
"to": "
"phoneId": "
"type": "
"video": {
"link": "
"caption": "
},
"source": "
"linkWithRecord": True,
"submissionStatus": True
}
headers = {
"Authorization": "Bearer
"Content-Type": "application/json"
}
response = requests.request("POST", url, json=payload, headers=headers)
print(response.text)
Syntax to send WhatsApp location message
import requests
url = "https://api.zixflow.com/api/v1/campaign/whatsapp/message/send"
payload = {
"to": "
"phoneId": "
"type": "
"location": {
"latitude": "
"longitude": "
"name": "
"address": "
},
"source": "
"linkWithRecord": True,
"submissionStatus": True
}
headers = {
"Authorization": "Bearer
"Content-Type": "application/json"
}
response = requests.request("POST", url, json=payload, headers=headers)
print(response.text)
Pricing of WhatsApp Cloud API
For WhatsApp Cloud API pricing, businesses are charged based on the number of messages they send. However, in WhatsApp, conversations fall into one of two kinds. As follows:
User-initiated
A user-initiated discussion is one in which your customer contacts you and you respond back to them. This conversation doesn’t cost anything but you have to reply within 24 hours.
Business-initiated
The interaction is referred to as a business-initiated chat once you, a business, message a user or if you respond after 24 hours following a user-initiated message.
WhatsApp offers the first 1000 conversations each month for free. If you want to send more messages, you have to add the balance to your Meta Business account.
Additionally, WhatsApp won't charge you when your customers contact them through their Click-To-Action (CTA) buttons. To learn more about WhatsApp’s pricing, refer to its pricing page.
Elevate your outreach efforts with WhatsApp Cloud API
Simply put, the timing could not have been better if you are a small business owner who is now thinking about adopting the WhatsApp Business API.
Businesses in the past had difficulty gaining access to WhatsApp Cloud API; now, you may do it in a couple of minutes.
Additionally, there is no need for you to contact a BSP that will charge you extra money to get you access to the API. Nevertheless, I still advise completing the Facebook Verification because failing to do so will prevent you from taking advantage of the WhatsApp Cloud API's fascinating possibilities.
Also, you can sign up for Zixflow for free to boost the productivity of your business and by using a single, intuitive dashboard, leverage WhatsApp Cloud API tools to send tailored promotional and information messages at scale.
All trademarks mentioned belong to their respective owners. For instance, "WhatsApp" and its logo are trademarks of WhatsApp, LLC, used here for reference only under Fair Usage Policy. We make no claim of ownership.
